gnugp is very useful to encrypt files using a public key – this allows you to create backups without sharing a keyfile. But it’s a bit tricky to explicitly use a public-keyfile instead of the global keyring via fingerprint. Directory Structure# This script creates a custom .gnupg directory (gpg home) in the current working directory […]

BusyBox: fancy cli color prompt via PS1

busybox ps1 profile colors

PS1 magic# The default prompt of BusyBox ash shell looks a bit old fashioned . But thanks to nearly full support of the PS1 environment variable you can customize the prompt to match your needs. Customizing the PS1 variable is quite simple: just add /etc/profile which is read automatically by ash when it’s used as […]

Grandstream VoIP over OpenVPN

asterisk, gxp1625, vpn, settings, config, nat

Grandstream VoIP telephones are very popular because of their high build quality compared to an excellent price. In some cases you want to use an encrypted communication channel between your device and the PBX (e.g. asterisk). The current grandstream firmware includes basic OpenVPN support (client mode, tun) which allows you to tunnel the whole SIP/RTP traffic over an encrypted channel. This is also the best solution to avoid any kind of NAT/routing issues because all devices are directly accessible within the virtual ip subnet.

OpenVPN Server Config#

Use the following (minimal) configuration as template. The important options are set to work with the current grandstream firmware (1.0.4.106). Certificate based authentication is preferred for security (login/password not needed)!

tls-server
dev tunX
topology subnet
server 172.16.1.0 255.255.255.0
port 10111
proto udp

# cert based auth
pkcs12 server.p12

# 1024 and 2048 bit dh params are supported
dh dh2048.pem
keepalive 10 120
script-security 2

# bh-cbc as well as aes-128-cbc are supported by the current firmware
cipher aes-256-cbc

# well sha1 is a bit weak but its set within grandstream firmware
auth sha1

# compression has to be enabled
comp-lzo

tun-mtu 1500
mtu-disc yes

# custom logging
verb 3

# retain TOS flags (VoIP)
passtos

# internal network (VOIP Server)
push "route 10.16.0.1 255.255.255.0"

Notes#

  • Don’t forget to alter your firewall rules. The new OpenVPN subnet needs to be accessible by your VoIP Server (e.g. asterisk) and vice versa
  • Add Quality-of-Service rules to your router which matches the OpenVPN port set above. The traffic should be marked with class EF (realtime, expected forwarding) to avoid package lost. Default VoIP rules will not match because of the encrypted channel!

pfSense: Persistent OpenVPN Connection to Strato-HiDrive

openvpn, tls-auth, key-direction, smb, encryption

You may use Strato HiDrive as an external storage for team collaboration, internal file-sharing or remote backups. In such cases it can be very useful to establish the secure connection via your corporate UTM Gateway instead on each client. This only requires an additional HiDrive Account which has the ability to connect via VPN (Login allowed via OpenVPN).

This solution requires the HiDrive business plans with advanved protocol featureset!

Step 1 – Download the OpenVPN Config Package#

First of all, you have to download the official openvpn config package directly from the Strato Website. It contains the CA, TLS-Auth Key as well as a poor OpenVPN Config.

Step 2 – Upload the CA#

Go into the pfSense Webinterface and add a new CA – paste the content of the ca.drive.strato.com.crt file into the textarea and save it. The CA is now available within the OpenVPN Client config.
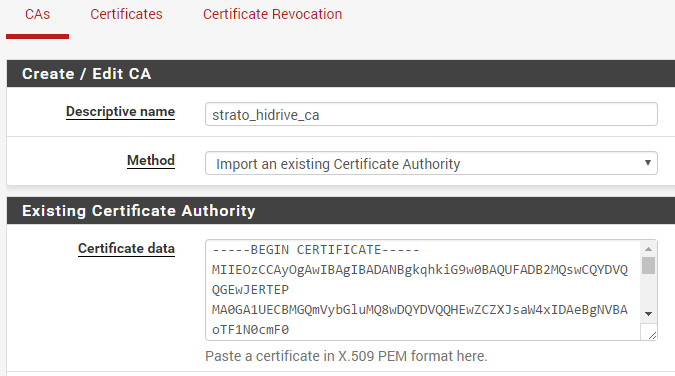
Step 3 – Create a new VPN Client Instance#

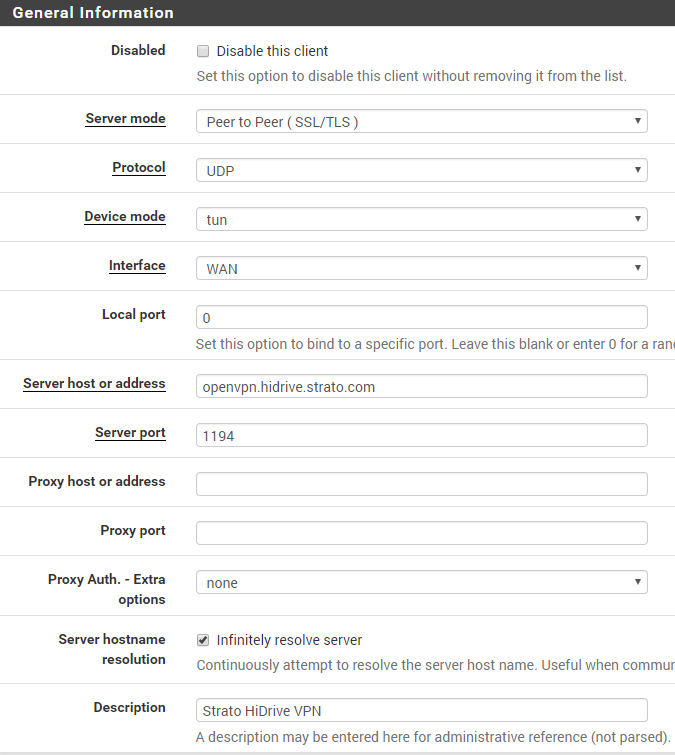
Finally goto VPN -> OpenVPN -> Clients and create a new instance.

Connection Settings#
User-Authentication#

You should use a dedicated HiDrive User-Account which has the ability to connect via VPN. Use this account credentials for the OpenVPN User Authentication.

Ciphers#

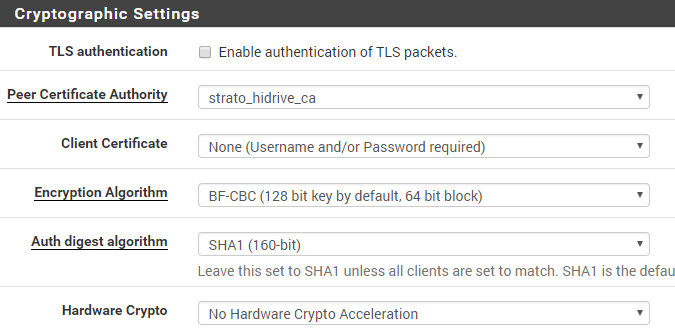
By default, OpenVPN uses BF-CBC as cipher with SHA1 auth – not AES as set in pfSense GUI.
TLS-Auth#

This is the most tricky/weak part..Strato is using the TLS-Auth Key in bidirectional mode, which is not recommended. Normally the key-direction 0 will be used for servers, 1 for clients and pfSense is not offering an option to change this via the GUI.

But its possible to add the TLS-Auth Key as inline statement under “Advanced Configuration -> Custom Options” without a key-direction (bidirectional by default). Just paste the following code. It contains the TLS-Auth key as of Mai 2017.
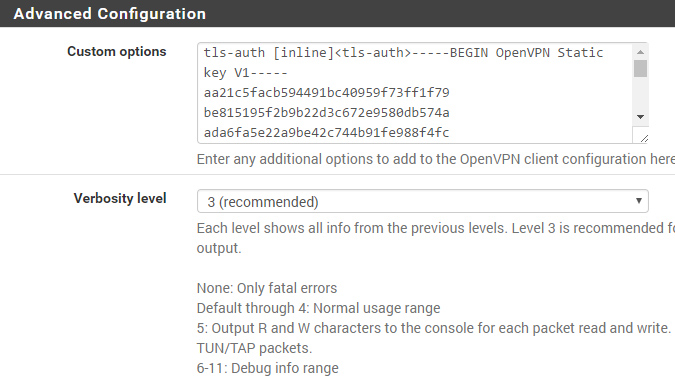
Manual TLS-Auth Config

tls-auth [inline]<tls-auth>-----BEGIN OpenVPN Static key V1-----
aa21c5facb594491bc40959f73ff1f79
be815195f2b9b22d3c672e9580db574a
ada6fa5e22a9be42c744b91fe988f4fc
582480ae85ea00fd59b60757d7cf859d
ceb3ca0f35b0ba9af1947521de78a917
7947ffb55a1fef3d800779fac89d2879
fe9f8fd87a99b1f82561ab9b2e91e5c2
e788f92016f5f47ba1ff158897a26a5c
79f627de5c48a9828c0ca4df34b5ef40
eab016669f28e0c84ed6c7974a12ec19
15a16e213d4a70832c85b59ccc74277f
da3309006c90289f1fca2c726eada188
3a86299a865149b7e178ad6235e1a153
775896594296ff24d2ab63f881021a2b
8a23e100df2153e332c0d0bb555185eb
2da94fd9b2b1b950acd075044607eddf
-----END OpenVPN Static key V1-----</tls-auth>

systemd: Start your Firewall before network interfaces coming up

linux debian, ubuntu, systemd, networking, uptables

There are a serveral “tutorials” and code snippets out there but they wont work on modern systemd versions and may cause fatal errors! In case you want to start your firewall before the network interfaces will be initialized, you have to hook into the special systemd target network-pre.target. It is a passive target which is invoked before any network services has been started.

Additionally, you have to explicit set the DefaultDependencies=no option – otherwise systemd automatically adds dependency of the type After=basic.target to your service and your firewall is invoked AFTER networking has been started!

Systemd Service File#

The following service file assumes that your firewall script is located in /usr/sbin/myfirewall.sh

[Unit]
Description=MyFirewall

# Start before Network Interfaces coming up
Before=network-pre.target
Wants=network-pre.target
After=local-fs.target

# Do not start after basic.target!
DefaultDependencies=no

[Service]
ExecStart=/usr/sbin/myfirewall start
ExecStop=/usr/sbin/myfirewall stop

# Just Execute the shell script
Type=oneshot
RemainAfterExit=yes

Debugging Service Startup#

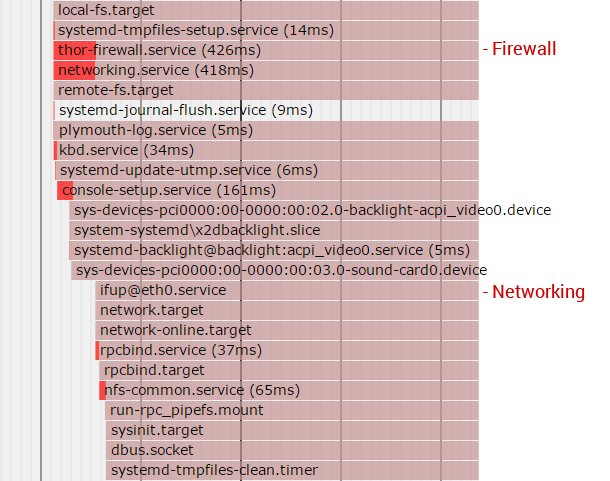
The systemd-analyze utility provides a really cool way to show the system startup. Finally you should verify that your firewall is executed before networking has started!

# dump the service startup
systemd-analyze plot > /root/systemd_startup.svg

Example#

Startup of the Firewall and Networking

As of WordPress 4.6 it is possible to hook into the wp_send_new_user_notifications action to disable the new user notifications send to site admins or the new user.

// The Parameter "$behaviour" can be set to:
// "none" (no notifications are send); 
// "default" (no changes); 
// "admin" (notifications send to admin only); 
// "user" (notification send to user only); 
// "both" (notifications send to admin + user)
public static function limitNewRegistrationNotifications($behaviour){
    // do nothing
    if ($behaviour == 'default'){
        return;
    }

    // handle user registrations (self registered users)
    remove_action('register_new_user', 'wp_send_new_user_notifications');

    // new users added via wp-admin are created using add_user() -> edit_user() chain, NOT register_new_user()
    // @see https://developer.wordpress.org/reference/functions/add_user/
    remove_action('edit_user_created_user', 'wp_send_new_user_notifications', 10, 2);

    // notifications disabled ?
    if ($behaviour == 'none'){
        return;
    }

    // add custom callback and override the $notify setting with custom behaviour
    add_action('register_new_user', function($user_id) use ($behaviour){
        // trigger notification
        wp_new_user_notification($user_id, null, $behaviour);
    });
    add_action('edit_user_created_user', function($user_id) use ($behaviour){
        // trigger notification
        wp_new_user_notification($user_id, null, $behaviour);
    });
}


This Tweak is available as part of the Tweakr WordPress Plugin.

WordPress: Get Raw Document Title without Blog Name

document_title_parts, wp_get_document_title

Sometimes it is necessary to retrieve the current Document Title (used in the title tag) without the blog name or separators. As of WordPress 4.4 the wp_get_document_title() function become available which should be used to fetch the title – unfortunately it doesn’t accept any arguments and it is not possible to access the pure page title directly. Instead we can hook into the document_title_parts filter which allows us to access all title parts (title, page, tagline, site).

Workaround#

// workaround to retrieve the document title
function getDocumentTitle(){
    // temporary title
    $documentTitle = 'Unknown';

    // extractor function
    $extractor = function($parts) use (&$documentTitle){
        if (isset($parts['title'])){
            $documentTitle = $parts['title'];
        }
        return $parts;
    };

    // add filter to retrieve the page title
    add_filter('document_title_parts', $extractor);

    // trigger title generation
    wp_get_document_title();

    // remove filter
    remove_filter('document_title_parts', $extractor);

    // return result
    return $documentTitle;
}


Currently (v380.64_2) there is no out-of-the-box mechanism to setup persistent crontabs which survives a system reboot. But there is a simple workaround availabe.

Your Crontab File#

First of all, create a standard crontab file and store it in your persistent JFFS partition. In this example /jffs/configs/cron

# Syntax
# MM HH DayOfMonth Month DayOfWeek <action>

# Run Backup Script at 4am
0 4 * * * /jffs/scripts/backup.sh

Setup Crontabs on startup#

To load the crontab list on boot, add the following line to your init-start script in /jffs/scripts/init-start

cp /jffs/configs/cron /var/spool/cron/crontabs/admin

That’s it!

Contact Form 7: Add Custom Data Providers to Select Elements/Tags

wordpress, wpcf7, select, values, database, lists, callback, programmatically

Every WordPress Power User knows the awesome Contact Form 7 plugin. It is (one of) the best plugins to create custom forms without any PHP knowledge – especially useful for endusers/customers.

But sometimes you need to create select list values programmatically. Unfortunately the Contact Form 7 Docs are very poor in matter of advanced use cases including the build-in filter hooks.

WPCF7 Form Editor#

Just add a unique name to the data attribute – in this example my.data.provider. This allows you to match the element within the filter hook!

<p>
<label> My List
    [select mylist include_blank data:my.data.provider]
</label>
</p>

Filter Hook#

Roll the drums…the magical filter hook wpcf7_form_tag_data_option allows you to alter the options list and add options/values to the select list within a simple callback

add_filter('wpcf7_form_tag_data_option', function($n, $options, $args){
    // special data provider tag found ?
    if (in_array('my.data.provider', $options)){
        return get_my_value_list();
    }

    // default - do not apply any changes within the options
    return null;
}, 10, 3);

Well, thats it!

HowTo: Wakeup your Synology NAS from Standby/Power Save Mode

timeout, linux, ubuntu, backup, scp, sftp, System Hibernation, backup

Scheduled Backups from Remote Locations#

As poweruser, you may have different servers out there which send their backups to a centralized backup location – in this example, a Synology NAS. The file transfers can be done by ftp, sftp, scp, nfs or another supported protocol.

In case you want to safe energy costs, it possible to enable the power safe mode which turns the system (as well as the HDDs) in standby mode. It can be waked-up by accessing the web-interface or some other file services, but this will take around 30-60s! In most cases, this behaviour will cause a timeout or connection refused error in your backup scripts. To prevent this, you can wake up your NAS before running the backup tasks. The following script tries to access the Web-Interface (DSM) on port 80 for a several times and returns 0 as exit code in case a valid response is returned by the remote server.

Wake-Up Script#

#!/bin/bash

# Synology NAS Wake-up
# ------------------------------------

# hostname/ip set ?
if [ -z "$1" ]; then
    echo "Usage: synology_wakeup.sh <hostname>"
    exit 1
fi

# get the server response. 5 connection tries with 10s delay -> 200s wait
serverResponse=$(wget --quiet --max-redirect=0 --retry-connrefused --timeout=20 --wait=10 --tries 5 --server-response -O /dev/null $1 2>&1)

# http detection pattern (response will be empty on con_refused)
detectionPattern="HTTP/1.1 (200|30[0-8])"

# server online ?
if [[ $serverResponse =~ $detectionPattern ]] ; then
    exit 0
else
    exit 1
fi

Usage#

Just run the script by passing the ip addess/hostname to it. On error (non responding nas) the script will return the exit code 1.

#!/bin/bash

# your backup/pre backup script

# wakeup your NAS by its IP/Hostname
./synology_wakeup.sh 192.168.0.100

# successfull ?
if [ $? -ne 0 ]; then
   echo "ERROR - Synology NAS seems to be offline!"
   exit 1
fi