Node.js: Log static file requests with expressjs serve-static middleware

nodejs, express, static, logfile, analytics, statistics, download counter

In most cases, every web-application requires some kind of request logging. Especially package downloads will be counted for statistic purpose. By using expressjs, static content is served by the middleware module serve-static.

To count the successfull requests handled by this module, you can hook into the setHeaders callback which is invoked each time a file is ready for delivering (file exists, file is accessible).

Example#

// utility
const _path = require('path');

// expressjs
const _express = require('express');
let _webapp = _express();

// your statistic module
const _downloadStats = require('./download-counter');

// serve static package files
_webapp.use('/downloads', _express.static(_path.join(__dirname, 'downloads'), {
    // setHeaders is only called on success (stat available/file found)
    setHeaders: function(res, path, stat){
        // count request: full-path, file-stats, client-ip
        _downloadStats(path, stat, res.req.connection.remoteAddress);
    }
}));
 

systemd: Start your Firewall before network interfaces coming up

linux debian, ubuntu, systemd, networking, uptables

There are a serveral “tutorials” and code snippets out there but they wont work on modern systemd versions and may cause fatal errors! In case you want to start your firewall before the network interfaces will be initialized, you have to hook into the special systemd target network-pre.target. It is a passive target which is invoked before any network services has been started.

Additionally, you have to explicit set the DefaultDependencies=no option – otherwise systemd automatically adds dependency of the type After=basic.target to your service and your firewall is invoked AFTER networking has been started!

Systemd Service File#

The following service file assumes that your firewall script is located in /usr/sbin/myfirewall.sh

[Unit]
Description=MyFirewall

# Start before Network Interfaces coming up
Before=network-pre.target
Wants=network-pre.target
After=local-fs.target

# Do not start after basic.target!
DefaultDependencies=no

[Service]
ExecStart=/usr/sbin/myfirewall start
ExecStop=/usr/sbin/myfirewall stop

# Just Execute the shell script
Type=oneshot
RemainAfterExit=yes

Debugging Service Startup#

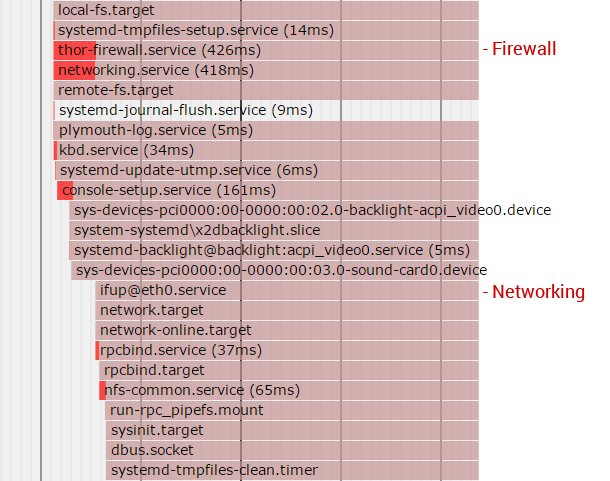
The systemd-analyze utility provides a really cool way to show the system startup. Finally you should verify that your firewall is executed before networking has started!

# dump the service startup
systemd-analyze plot > /root/systemd_startup.svg

Example#

Startup of the Firewall and Networking

As of WordPress 4.6 it is possible to hook into the wp_send_new_user_notifications action to disable the new user notifications send to site admins or the new user.

// The Parameter "$behaviour" can be set to:
// "none" (no notifications are send); 
// "default" (no changes); 
// "admin" (notifications send to admin only); 
// "user" (notification send to user only); 
// "both" (notifications send to admin + user)
public static function limitNewRegistrationNotifications($behaviour){
    // do nothing
    if ($behaviour == 'default'){
        return;
    }

    // handle user registrations (self registered users)
    remove_action('register_new_user', 'wp_send_new_user_notifications');

    // new users added via wp-admin are created using add_user() -> edit_user() chain, NOT register_new_user()
    // @see https://developer.wordpress.org/reference/functions/add_user/
    remove_action('edit_user_created_user', 'wp_send_new_user_notifications', 10, 2);

    // notifications disabled ?
    if ($behaviour == 'none'){
        return;
    }

    // add custom callback and override the $notify setting with custom behaviour
    add_action('register_new_user', function($user_id) use ($behaviour){
        // trigger notification
        wp_new_user_notification($user_id, null, $behaviour);
    });
    add_action('edit_user_created_user', function($user_id) use ($behaviour){
        // trigger notification
        wp_new_user_notification($user_id, null, $behaviour);
    });
}


This Tweak is available as part of the Tweakr WordPress Plugin.

WordPress: Get Raw Document Title without Blog Name

document_title_parts, wp_get_document_title

Sometimes it is necessary to retrieve the current Document Title (used in the title tag) without the blog name or separators. As of WordPress 4.4 the wp_get_document_title() function become available which should be used to fetch the title – unfortunately it doesn’t accept any arguments and it is not possible to access the pure page title directly. Instead we can hook into the document_title_parts filter which allows us to access all title parts (title, page, tagline, site).

Workaround#

// workaround to retrieve the document title
function getDocumentTitle(){
    // temporary title
    $documentTitle = 'Unknown';

    // extractor function
    $extractor = function($parts) use (&$documentTitle){
        if (isset($parts['title'])){
            $documentTitle = $parts['title'];
        }
        return $parts;
    };

    // add filter to retrieve the page title
    add_filter('document_title_parts', $extractor);

    // trigger title generation
    wp_get_document_title();

    // remove filter
    remove_filter('document_title_parts', $extractor);

    // return result
    return $documentTitle;
}


Currently (v380.64_2) there is no out-of-the-box mechanism to setup persistent crontabs which survives a system reboot. But there is a simple workaround availabe.

Your Crontab File#

First of all, create a standard crontab file and store it in your persistent JFFS partition. In this example /jffs/configs/cron

# Syntax
# MM HH DayOfMonth Month DayOfWeek <action>

# Run Backup Script at 4am
0 4 * * * /jffs/scripts/backup.sh

Setup Crontabs on startup#

To load the crontab list on boot, add the following line to your init-start script in /jffs/scripts/init-start

cp /jffs/configs/cron /var/spool/cron/crontabs/admin

That’s it!

Contact Form 7: Add Custom Data Providers to Select Elements/Tags

wordpress, wpcf7, select, values, database, lists, callback, programmatically

Every WordPress Power User knows the awesome Contact Form 7 plugin. It is (one of) the best plugins to create custom forms without any PHP knowledge – especially useful for endusers/customers.

But sometimes you need to create select list values programmatically. Unfortunately the Contact Form 7 Docs are very poor in matter of advanced use cases including the build-in filter hooks.

WPCF7 Form Editor#

Just add a unique name to the data attribute – in this example my.data.provider. This allows you to match the element within the filter hook!

<p>
<label> My List
    [select mylist include_blank data:my.data.provider]
</label>
</p>

Filter Hook#

Roll the drums…the magical filter hook wpcf7_form_tag_data_option allows you to alter the options list and add options/values to the select list within a simple callback

add_filter('wpcf7_form_tag_data_option', function($n, $options, $args){
    // special data provider tag found ?
    if (in_array('my.data.provider', $options)){
        return get_my_value_list();
    }

    // default - do not apply any changes within the options
    return null;
}, 10, 3);

Well, thats it!

External USB 3.0 SSD with Full Disk Encryption

ata encryption, aes256, ASM1053E, ubuntu, linux, external case, caddy, intel 535 series

Preface# External USB drives are everywhere these days, used as storage extension, data transport facility or backup drive. If you need a reliable, schock resistent and secure solution an external SSD might be the best choice instead of an old fashioned hard drive. Especially in case the drive got stolen, a SSD can protect your data […]

HowTo: Wakeup your Synology NAS from Standby/Power Save Mode

timeout, linux, ubuntu, backup, scp, sftp, System Hibernation, backup

Scheduled Backups from Remote Locations#

As poweruser, you may have different servers out there which send their backups to a centralized backup location – in this example, a Synology NAS. The file transfers can be done by ftp, sftp, scp, nfs or another supported protocol.

In case you want to safe energy costs, it possible to enable the power safe mode which turns the system (as well as the HDDs) in standby mode. It can be waked-up by accessing the web-interface or some other file services, but this will take around 30-60s! In most cases, this behaviour will cause a timeout or connection refused error in your backup scripts. To prevent this, you can wake up your NAS before running the backup tasks. The following script tries to access the Web-Interface (DSM) on port 80 for a several times and returns 0 as exit code in case a valid response is returned by the remote server.

Wake-Up Script#

#!/bin/bash

# Synology NAS Wake-up
# ------------------------------------

# hostname/ip set ?
if [ -z "$1" ]; then
    echo "Usage: synology_wakeup.sh <hostname>"
    exit 1
fi

# get the server response. 5 connection tries with 10s delay -> 200s wait
serverResponse=$(wget --quiet --max-redirect=0 --retry-connrefused --timeout=20 --wait=10 --tries 5 --server-response -O /dev/null $1 2>&1)

# http detection pattern (response will be empty on con_refused)
detectionPattern="HTTP/1.1 (200|30[0-8])"

# server online ?
if [[ $serverResponse =~ $detectionPattern ]] ; then
    exit 0
else
    exit 1
fi

Usage#

Just run the script by passing the ip addess/hostname to it. On error (non responding nas) the script will return the exit code 1.

#!/bin/bash

# your backup/pre backup script

# wakeup your NAS by its IP/Hostname
./synology_wakeup.sh 192.168.0.100

# successfull ?
if [ $? -ne 0 ]; then
   echo "ERROR - Synology NAS seems to be offline!"
   exit 1
fi


HowTo: Flashing NodeMCU Firmware to ESP8266

esptool.py, nodemcu, ubuntu, debian

NodeMCU Firmware# From time to time, you should take a look into the official NodeMCU Firmware repository. It is under heavy development and new modules and features are added constantly. Since version 0.9.6, there are no binary releases available, because the large amount of available module will not fit into the flash. Instead, you can […]

Firmware Update of IBM ServeRaid BR10i with Ubuntu

system x, x3550 m3, LSI SAS 1068E, ibm 7944

I have just got a used IBM x3550 M3 server as development machine and ran into some trouble when trying to add some SSDs: the throughput was pretty slow (~100MB/s). Generally the BR10i controller supports 3G SATA2 and therefore i expected a throughput of ~250MB. I’ve figured out, that this behaviour is caused by the firmware […]